
Container Orchestration Part 1
MONITORAPP R&D Cloud Team Lead: Semin Kwon
 2020 is the era of virtualization. With the synergy of cloud market growth, the virtualization market and its technologies are developing more efficiently and conveniently than before. Several big players in the IT market are introducing their industry-leading cloud and virtualization platforms and other IT companies are introducing cloud and virtualization to catch up with the market trend. MONITORAPP has also developed a cloud-based security platform called AISASE using virtualization technology. This article will discuss Kubernetes and Docker technology used to develop the virtualization product.
- Service configuration using Docker and Docker Stack
 After installation, we will create a simple web server container that will return its name for testing. The container creation command is: docker run <option> [image_name].
 -p is an option that is short for publish and it connects the host (the server that runs the container) and the container port. I have connected the host’s port 8018 to the container’s port 80 so that the webserver is externally accessible using the 8018 port.
 4379b6feab65 in the red box is the container's name (ID), which can be checked through the docker ps command.
 Let’s say that while using Docker to manage the service, due to the expansion of the service, a more complex container configuration is requested. You can create additional containers using the docker run command, but that can bring a number of difficulties, including setting up the container network. If that’s the case, it can be easily solved by using docker-compose. Let’s create two web servers that return their names using docker-compose.
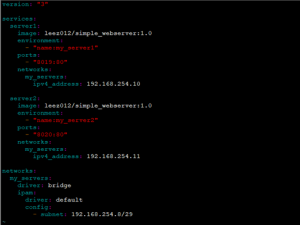 The screenshot above is the configuration file to use compose. In composing, the application running in the container is managed as a service. To run two web servers, create a file called a docker-compose.YAML and enter it. Server 1 and 2 are assigned ports 8019 and 8020.
 The command to run compose is docker-compose up -d. With the -d option, it can be executed as a daemon-type background process. Since compose operates based on configuration files, it must be run from the directory containing the YAML file created previously. The configuration file can be specified with the docker-compose -f option, if there is no -f option, the docker-compose.yaml file is set as the default. In the screenshot above, since the configuration file was not specified, the service was created based on docker-compose.yaml in the same directory.
 You can check the service status by using the docker-compose ps command.
 You can also use docker ps to check the container. Hence, compose is a tool designed to run and manage multiple containers at once instead of managing each container separately.
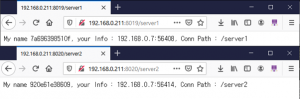 If you connect to the port you have set, you can see that it is connected to both containers. Now let’s say you have been managing various services through compose but the number of users has increased and service expansion is needed. If the number of users is consistent then you can change the specs, but the visitors are concentrated on a specific time. So it is decided to increase the number of containers only during that time period. With compose, you can run and manage multiple containers at the same time, but since there is a big inconvenience of assigning and managing ports for each individual service, we will deploy the service using docker stack. To use the stack, you have to set docker swarm mode.
 Enable swarm mode using docker swarm init command. The node that executes the init command is assigned as a managed node. If you want to add another node to the swarm cluster, then enter the join command output from the corresponding node. However, in this article, we will test with a single node.
 You can check the status of the nodes in the cluster with the docker node ls command. The manager status is shown as Leader. The Leader commands and manages all the containers in the swarm cluster.
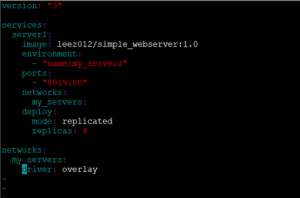 The network driver was changed to overlay to connect multiple containers with a single port. When the driver is set to overlay, traffic is distributed automatically through the docker’s internal virtual network.
 Depending on the stack setting, it creates a network called my_servers and service called server1. The last part of the command is the stack name, which corresponds to a prefix to identify multiple services on the stack. Hence, with just one configuration file, you can deploy multiple stacks. The same service can be easily copied, which is useful for large-scale patching of the entire service. Our team uses the stack to update service without interruption using these steps: (1) Copy service -> (2) Allocate network as a new service -> (3) Service test -> (4) Delete the existing service
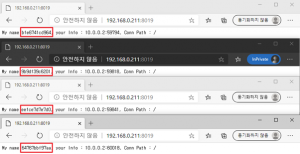 Since we specified 4 replicas in the configuration file, we created 4 containers that perform the same function. Using the overlay network, when accessing the network through port 8019, the traffic is distributed to the 4 containers. If the service stops on one of the containers, it will be excluded from receiving traffic and once the service is reinstated, it will start receiving traffic again.
As you can see from this test, Docker provides convenience when it comes to service distribution, management, and patching. Also, sharing the server’s resources, reduces cost, and simplifies the infrastructure. In fact, MONITORAPP also operated many physical servers in the DMZ, but after the introduction of Docker, it was reduced to 5 units, reducing the administrative cost significantly. If you are an IT infrastructure manager, we highly recommend you use it at least once.
In part 2, we will use Kubernetes to configure the service in the same way.
Since we specified 4 replicas in the configuration file, we created 4 containers that perform the same function. Using the overlay network, when accessing the network through port 8019, the traffic is distributed to the 4 containers. If the service stops on one of the containers, it will be excluded from receiving traffic and once the service is reinstated, it will start receiving traffic again.
As you can see from this test, Docker provides convenience when it comes to service distribution, management, and patching. Also, sharing the server’s resources, reduces cost, and simplifies the infrastructure. In fact, MONITORAPP also operated many physical servers in the DMZ, but after the introduction of Docker, it was reduced to 5 units, reducing the administrative cost significantly. If you are an IT infrastructure manager, we highly recommend you use it at least once.
In part 2, we will use Kubernetes to configure the service in the same way. 

